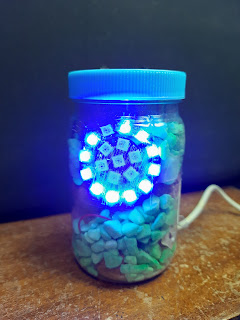
Project: Making a Timer with the Raspberry Pi Pico
Here is a simple and fun project: a countdown timer using an RGB LED rings and a Pi Pico.
 |
| The assembled timer |
(this was first posted in my Portuguese blog in July 20, 2021)
I have made a few timers, using various kinds of displays. In this project I use an RGB LED ring to show the remaining time. For added fun there is a vibration sensor to accelerate the timer if someone tries to temper it.
The Pi Pico maybe too powerful for such a simple application, but its power allow us to develop the software using MicroPython.
Here are the parts that I used:
- A Raspbery Pi Pico (there should be no difficulty in adapting the project to other RP2040 based boards)
- Two RGB LED rings, one with 12 LEDs and the other with 7. The smaller ring goes inside the bigger one, with three pieces of rigid wire connecting the OUT and power pins of the external ring to the IN and power pins of the internal ring. These wires also hold the inner ring in place.
- A 5V buzzer
- Two pushbuttons (I used a very small one, but you can select whatever looks nice)
- A vibration/movement sensor
 |
| Left: the parts - Right: LED rings assembly |
The connections are simple. I soldered wires directly to the Pi Pico and other parts, except for the vibration sensor and LED ring (because they already had connectors):
Press button 2 to program the time: button 1 adds one minute (up to 12). Press button 2 again to end the programming. Press button 1 to start the timer. When the timer expires the LED will flash and the buzzer will beep until you press and hold one of the buttons. If you trip the vibration sensor the timer will accelerate.
The visuals of the project are as important as the hardware and software. And more fun. I used a plastic mayonnaise jar with the buttons at the lid. A glass one can be more visually appealing, but them the USB cable would also need to go through the lid (or you could use some kind of battery). For decoration I put inside the jar some expanded clay pebbles and some colored pebbles (used for garden decoration).
I have made a video (again, in Portuguese) showing the assembly and use of the timer: https://www.youtube.com/watch?v=To35ROd7_tY


Comments
Post a Comment