The New Raspberry Pi Pico 2, RP2350 and RP2354: a Short Recap
On August 8th, Raspberry announced a new version of the Pi Pico board, the Pi Pico 2, along with a new microcontroller, the RP2350 / RP2354. In this post I will tell the highlights of these new products, along with my comments.

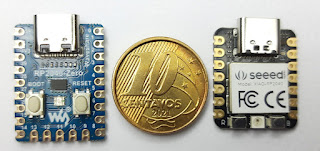
The Raspberry Pi Pico 2
There is not much to say about the board itself. The RP2040 is replaced by the new RP2350 and the 2 MB flash is replaced by 4 MB. Everything else is about the same, including the micro USB connector and the lack of a Reset button. It is clear that a main objective was to make a drop-in replacement for the older version. Price increase from US$4 to US$5.
A Pico W 2 board is expected before the end of the year, using the same RF chip as the current Pico W.
The RP2350A, RP2350B, RP2354A, and RP2354B
This is the important stuff, with great improvements over the RP2040.
The RP2040 has two ARM Cortex M0+ cores. The M0+ is establishing itself as the most popular core for entry-level microcontrollers, replacing the old 8-bit cores.
The new RP254x chips replace the M0+ by the M33, and they are very different animals. They are more recent, have a more advanced ARM architecture ( ARMv8-M vs ARMv6-M) with more instructions and features. This includes single-precision floating-point, DSP and TrustZone instructions. The RP254x also includes a double-precision co-processor to accelerate double-precision calculations. These are great news for applications like digital signal processing and machine learning.
The clock was also improved, from 133MHz to 150MHz. The overall expected improvement in performance (compared to the RP2040) is somewhere between 1.5 and 2.
RAM was also increased, from 264kB to 520kB. If you need more, the RP254x now supports external PSRAM.
If you are a PIO (Programmable I/O) fan, you will be happy to hear that now there are 3 PIOs, increasing the total number of state machines from 8 to 12. This is important as the state machines in a PIO share some common configurations and the same 32 position instruction memory. There are also some small improvements in the instructions available.
A new HSTX peripheral can do multi-bit serial transmission at higher rates than the PIOs. Adafruit has already used it to generate DVI video.
The RP254x has a lot of security features. It is now possible to secure the Flash against unauthorized software installation and encrypt the application. A new OTP memory can be used to store cryptographic keys. There are also mechanisms against fault injection (trying to get the processor in an invalid state where it relaxes the protection).
Power consumption has been improved, especially in the sleep state.
And now the big surprise: the RP235x has also two RISC-V cores! There are a few gotchas:
- You can have only two cores (from the four available) running at the same time
- Core switching involves a reset, so you should select the cores at boot time and not change it
- While it is possible to have an ARM core along a RISC-V core, things are a lot easier if you use only ARM or RISC-V cores.
- The RISC-V cores have no float-point instructions and no access to the double-precision co-processor or some security features
Comments
Post a Comment